-
Green-screen webcam on Linux
Having spent a large amount of time in video calls, for work and play, and being relatively familiar with many video editing techniques the idea of replacing my webcam background was always alluring. Having poked around the topic a few times there were not too many straightforward techniques for Linux much less producing a high quality result. Having utilized Open Broadcaster Software (OBS) fairly extensively I focused on trying to stream the output to a V4L2 loopback device.
Background
The idea was relatively simple, instead of outputting to a file or streaming service output to the loopback device. Then the loopback device could serve as my webcam in any video call application. Unfortunately, no matter what combination of settings were used it was not possible to write to the loopback device using the options available in OBS. Using an
ffmpegone can create a local rtmp server that outputs to a V4L2 loopback device.ffmpeg -re -listen 1 -i rtmp://0.0.0.0:13377/ -f v4l2 /dev/video17OBS can then be configured to stream to that address. That works, but has the downside of several seconds of delay between the camera input and the output on the loopback device. The delay is reasonable considering the stream is being encoded and decoded several times with a buffer at each step.
Being aware of CatxFish/obs-virtual-cam I decided to go about writing a V42L plugin for OBS, but thankfully I searched once again and found CatxFish/obs-v4l2sink had been created just a couple months before hand.
Solution
Since my machines run openSUSE Tumblweed for which I already maintain the obs-studio package I created an obs-v4l2sink package. Everything else needed was already provided in the main repository.
zypper in obs-v4l2sink v4l2loopback-kmp-defaultGiven there are a number of steps that need to be performed to setup the camera and that I would be doing them repetitively I went ahead and created the following script which I then added to my tray.

#!/bin/bash

if [ ! -e /dev/video17 ] ; then
  kdesu modprobe v4l2loopback video_nr=17 exclusive_caps=1 card_label="Green-screen Webcam"
fi

obs --profile "1080p @ 30 (vaapi)" --collection webcam-1080p --scene webcam-green-screen
Based on experimentation with different browsers
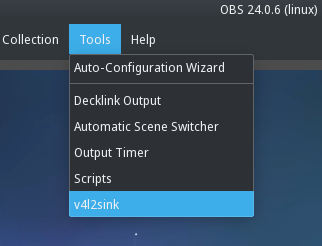
exclusive_caps=1andcard_label="..."are needed to have your webcam work everywhere. My script is explicit with the profile, collection, and scene since I use OBS for a variety of other things so I need the appropriate combination for use with webcam.Within OBS the obs-v4l2sink manifests plugin itself under Tools -> v42lsink menu item.
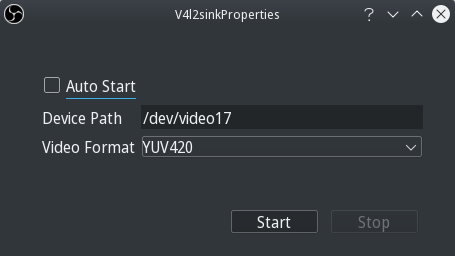
Auto Start is not useful for me since it applies globally so when using OBS for other tasks it still auto starts. Otherwise, that would eliminate having to click Start everytime, but the option may fit into your workflow.
OBS essentials
There are plenty of tutorials and documentation on setting up OBS, but for those unfamiliar I will include a few essentials relevant to using it for a green-screen webcam.
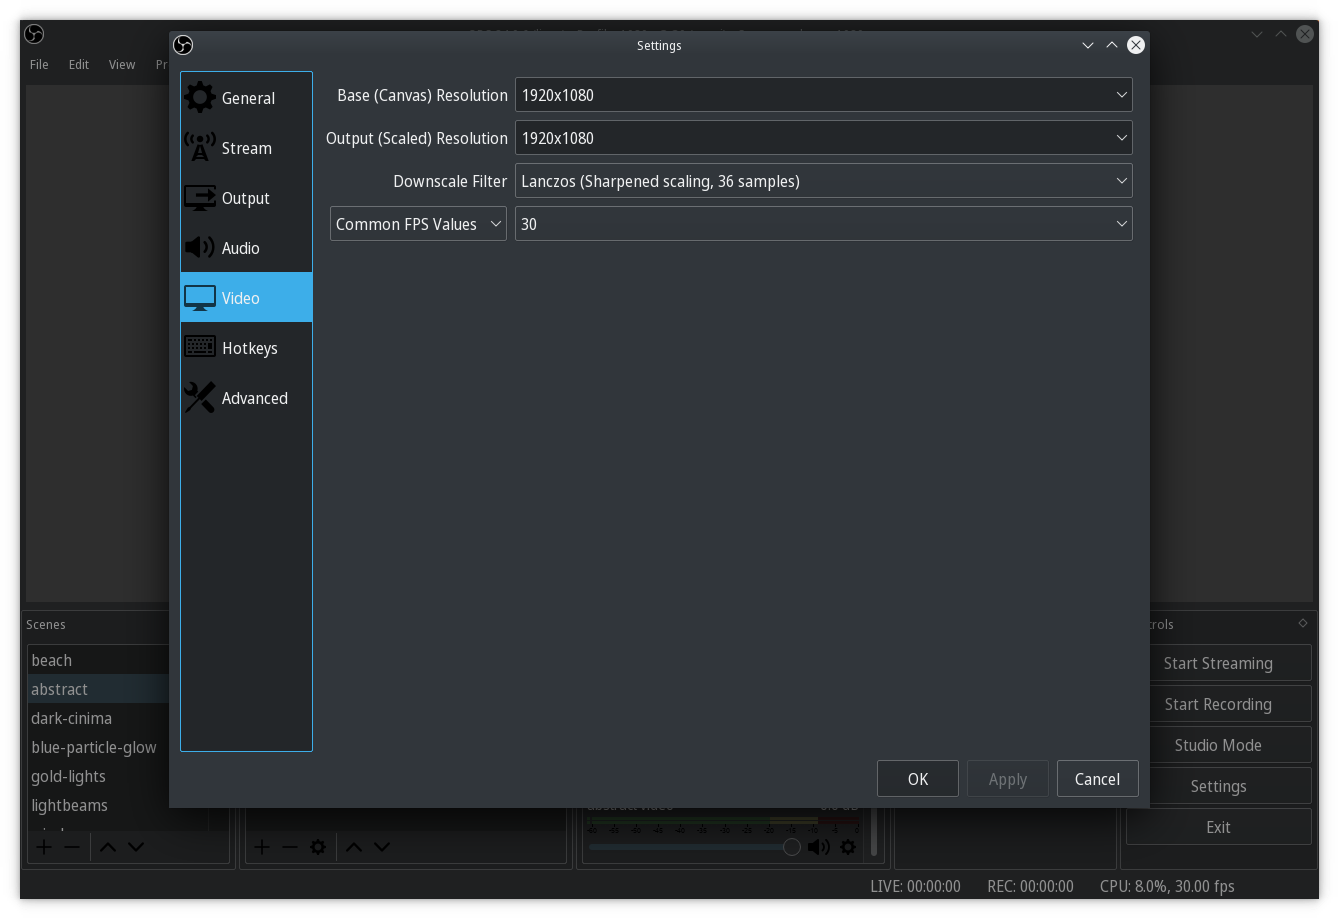
Configure the Video based on your desired output resolution. Depending on your webcam, size of your green-screen, and positioning of the two you may want to use different values, but otherwise set them to 1080p or 720p depending on your webcam.
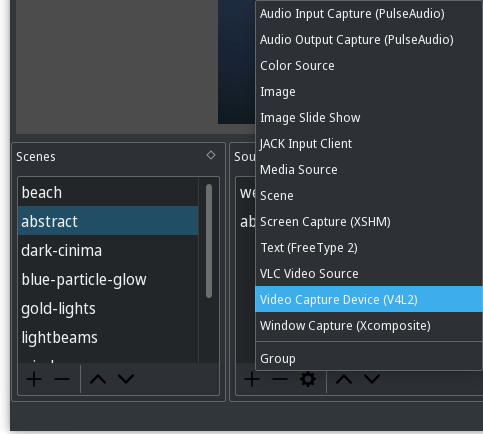
Add a Video Capture Device (V4L2) to your scene.
Add Chroma Key under Effect Filters and adjust to your liking. Then add a desired background image, video, etc to the scene behind the webcam source.
Depending on the aperture angle of your camera and the distance/size of green-screen you may need to add a Crop/Pad filter as well to reduce the source feed size within your scene.
Once complete you should have a new camera device in your browser (may need to restart it) and be able to achieve something like the following.
Green-screen
Originally, I used a white wall, but due to my complexion, clothing, and lighting it did not work as well as desired. Using an un-ironed, $15 green-screen with a basic white LED light in my ceiling fixture I was able to achieve a nearly perfect result.
Multiple backgrounds
I eventually added different backgrounds via multiple scenes and have my startup script randomly pick one by replacing the
obscommand with the following.scenes=( abstract blue-particle-glow dark-cinima gold-lights lightbeams ) scene_index=$(($RANDOM % ${#scenes[@]})) scene="${scenes[$scene_index]}" obs --profile "1080p @ 30 (vaapi)" --collection webcam-1080p --scene "$scene"Encoding oddities
With one of my first backgrounds, a static image, I encountered folks indicating that my background was “flashing”. The video on my end, even in the video call application, did not exhibit the behavior. After calling myself I was able to reproduce the results and concluded that the re-encoding done server side was causing the effect. I resolved it by using a busier background instead of one with a large solid color for the majority.
Conclusion
Having used this setup for roughly two years without issue it has been worth the effort to provide a snazy background instead of a boring wall or random room background. It has also amused many others with whom I have had calls.
-
Ported Drupal blog to Jekyll
Reworking my blog as a static site has been something I have been toying with for several years, but didn’t commit to seeing it through. I imagine a large part of this was due to falling out of writing posts for a number of reasons. For several months I enjoyed writing posts on a static blog covering my openSUSE work, but that also made it easier to avoid updating my blog.
I have finally completed the process and pushed out a blog based on Jekyll. The process certainly was not as straight forward as I expected and there are a decent number of gotchas. Since the conversion principally took place over the last year (no more than a few days work in total) I do not remember all the bits involved in converting it, but I’ll document the ones that I do remember in the hopes of saving someone else a bit of time.
Previously, my blog was built using Drupal 7, before that Drupal 6, and before that Blogger. As such the content is not designed for any of those systems, but rather a mix. I decided to try and avoid fully porting the content and instead only port the bits that necessitated it.
For posterity, here is the Drupal 7 and new Jekyll blog at the time of this writing.
Drupal 7
Jekyll

Initial conversion
Some posts and tooling exist to convert a Drupal site to Jekyll. Using the
jekyll-importgem as a basis I started with the following against a database dump of my Drupal 7 blog.#!/bin/bash if [ $# -ne 1 ] ; then echo "must specify a database dump to convert" fi echo "converting $1..." docker run --detach \ --name jekyll-mariadb \ -e MYSQL_ROOT_PASSWORD=jekyll \ -e MYSQL_DATABASE=jekyll \ mariadb sleep 15 docker cp "$1" jekyll-mariadb:/import.sql docker exec \ jekyll-mariadb \ mysql -uroot -pjekyll jekyll \ -e"source import.sql" docker run --detach \ --name jekyll-ruby \ --link jekyll-mariadb:mariadb \ ruby \ /bin/bash -c "sleep 1000000" docker exec \ jekyll-ruby \ /bin/bash -c " gem install jekyll-import mysql2 sequel pg && mkdir -p /convert && cd /convert && ruby -rrubygems -e 'require \"jekyll-import\"; JekyllImport::Importers::Drupal7.run({ \"dbname\" => \"jekyll\", \"user\" => \"root\", \"password\" => \"jekyll\", \"host\" => \"mariadb\", \"prefix\" => \"\", \"types\" => [\"blog\", \"story\", \"article\"] })' " docker cp jekyll-ruby:/convert convert docker rm -f jekyll-mariadb docker rm -f jekyll-rubyThat produced a rough Jekyll site containing all of my content which provided a solid basis from which to iterate.
Site generation
I played around with a variety of the installed and dockerized Jekyll setups, but found them all rather lacking and cumbersome. I ended up pushing everything to Github (
blog-testsubdomain prior to completion) to avoid the mess as that was my target destination anyway.Using a
CNAMEfile in the repository root and configured DNS to point toboombatower.github.ioI was able to view the site.Content cleanup
Given the posts on my blog date back to 2007 it, rather reasonably, turned out that a number of the posts embedded content that no longer existed. Additionally, some content had moved and while other worked it was deprecated or really should be self hosted.
First, I downloaded all the files still referencing
blogger.comand replaced the references with self-hosted ones using the following script.#!/bin/bash PREFIX='files/blogger' for url in $(grep -hRoP 'http://[^/]+blogger.com/[^"]+' _posts/) ; do filename="$(basename "$url")" if [[ $url == *"-h"* ]] ; then url="$(echo "$url" | sed 's|-h||')" else filename="$(echo "$filename" | sed 's|.png|.thumbnail.png|')" fi echo $filename $url wget -O "$PREFIX/$filename" "$url" find _posts/ -type f -exec sed -i "s|$url|$PREFIX/$filename|" {} \; doneReviewing posts I replaced dead content with short text which provided, for posterity, a reference to what was there.
Some embedded content that no longer worked (like Youtube videos and a Picasa Web Album (now Google Photos) required an updated embedded format.
A few external images referencing other blogs had been updated and had the URLs changed. With a bit of searching I was able to find the images download them and replaced the references.
One image was utilizing the long deprecated Google Charts API (image based), but Google apparently kept the service going so another download and replace.
Redirects
One of the problems I ran into was broken links due to URLs either changing or being removed. I was determined not to contribute to broken links by ensuring all the existing URLs on my blog continued working regardless of the new canonical URLs. While the
jekyll-importgem properly exported the various paths for a given post from Drupal it represented them as markdown files at the given path with instructions on where to redirect. For example,acquia-internship.md:--- layout: refresh permalink: acquia-internship/ refresh_to_post_id: /2009/06/15/acquia-internship ---Similarly,
node/61.md:--- layout: refresh permalink: article/61/ refresh_to_post_id: /2009/06/15/acquia-internship ---Overall, this was a bunch of files and not easy to manage aliases. Rather I was looking for a list of aliases in the actual post file. Thankfully, I found the
jekyll-redirect-fromgem. After adding to list of gems in_config.ymlthe following worked from within a post:--- redirect_from: - /somethingrandom - /node/123456789 ---I then wrote the following script to automate the conversion.
#!/usr/bin/env python3

import os
import yaml

directories = ['article', 'node', '.']
redirects = {}
for directory in directories:
    for entry in os.listdir(directory):
        if not entry.endswith('.md'):
            continue

        path = os.path.join(directory, entry)
        print('processing {}...'.format(path))
        with open(path) as f:
            parts = f.read().split('---')
            header = yaml.safe_load(parts[1])
            if not('permalink' in header and 'refresh_to_post_id' in header):
                continue

            post = os.path.join(
                '_posts', header['refresh_to_post_id'].lstrip('/').replace('/', '-') + '.md')

            redirects.setdefault(post, [])
            redirects[post].append(header['permalink'])

        os.remove(path)

print('writing {} redirects'.format(len(redirects)))

for post, paths in redirects.items():
    with open(post, 'r') as f:
        parts = f.read().split('---')

    with open(post, 'w') as f:
        parts[1] += 'redirect_from:\n- {}\n'.format('\n- '.join(paths))
        f.write('---'.join(parts))
Categories
After a bunch of exploration I ended up avoiding the categories and tags. Both seem to require a fair bit of configuration and a theme that support them. My goal was to keep this blog simple and most people will find my post from a search engine instead of perusing my blog.
Using a derivation of the above script I removed all the category information (tags from Drupal).
#!/usr/bin/env python3

import os
import yaml

directory = '_posts'
for entry in os.listdir(directory):
    if not entry.endswith('.md'):
        continue

    path = os.path.join(directory, entry)
    print('processing {}...'.format(path))
    with open(path) as f:
        parts = f.read().split('---')

    header = yaml.safe_load(parts[1])
    if 'categories' in header:
        del header['categories']

    # Force reformat all.
    parts[1] = '\n' + yaml.dump(header)

    with open(path, 'w') as f:
        f.write('---'.join(parts))
Syntax
Since many of the posts were written in using HTML instead of Markdown they had unfamiliar syntax highlighting tags. After incrementally finding them all I ended up with the following script to make the conversion. Nothing pretty, but does the trick.
#!/usr/bin/env python3

import os
import re

replacements = {
    '<?php': '```php',
    '?>': '```',
    '<bash>': '```bash',
    '</bash>': '```',
    '<mysql>': '```sql',
    '</mysql>': '```',
    '<code>': '```',
    '</code>': '```',
    '<diff>': '```diff',
    '</diff>': '```',
    '<yaml>': '```yaml',
    '</yaml>': '```',
    '<ini>': '```ini',
    '</ini>': '```',
    '<css>': '```css',
    '</css>': '```',
}

directory = '_posts'
for entry in os.listdir(directory):
    if not entry.endswith('.md'):
        continue

    path = os.path.join(directory, entry)
    print('processing {}...'.format(path))
    with open(path) as f:
        parts = f.read().split('---', 2)

    body = parts[2]

    # check for inline php first
    body = re.sub(r'<\?php (.*) \?>', r'`\1`', body)
    body = re.sub(r'<code>([^<\n]+)</code>', r'`\1`', body)
    body = re.sub(r'"`([^"]+)`"', r'`\1`', body)

    for old, new in replacements.items():
        body = body.replace(old, new)

    if body == parts[2]:
        continue

    parts[2] = body

    with open(path, 'w') as f:
        f.write('---'.join(parts))
Custom formatting
Some of my posts contained special inline image formatting where the image was contained within a
<div>containing a caption. The div hadfloat: rightapplied via CSS. Due to the image sizes and reduced width of the site I removed most of the formatting and some of the captions. Not ideal, but I expect little traffic on the old content and this leaves the most more than readable.Comment removal
A number of useful and positive comments had been left on my blog over the years, but a large number were ill conceived or blindly negative. Given I am the one maintaining providing things for free and gain next to nothing from comments I decided to drop them entirely. If folks want to contact me good ‘ol email works just fine.
Github pages minima version
It does not seem readily documented, if at all, but Github pages uses
minimaversion2.xinstead of the stable3.xwhich means one needs to read the documentation from the relevant branch instead ofmaster. The3.xversion changed a number of the configuration option keys along with the location for custom CSS which isassets/main.scssin the2.xversion.Closing
Overall, I am satisfied with the result and look forward to writing up some technical posts like this one.
-
Drupal testbot command line tool
Are you a developer familiar with the patch submission workflow?
- load the issue page in your browser
- add some helpful text describing the patch
- create a patch file
- upload it to the issue
- change the issue status to ‘Needs review’
- wait 20 minutes (at best) to find out if the tests pass or fail with your patch
If the tests fail, then you get to do it all over again, including making possible revisions to the issue summary.
Ever wanted to run the tests while iterating on a change, but are reluctant due to:
- insufficient local machine resources or configuration to run tests efficiently
- inconsistent results compared to the official testbot
- disruption of your ‘creative coding moments’ due to the patch submission workflow
- long test runtime on qa.d.o
Well you may be in luck.
What if you could type
drush testbotto have the changes in your working branch submitted and tested as a patch against Drupal? And be able to view the results in five minutes or less? If this sounds interesting, then install thedrush testbotcommand file (see instructions) and take it for a spin.Suggested usage
If your changes only affects a single module (or a few), then an assessment of your changes can often be had by simply running the tests for that module (or those modules). Once you know that your changes do not break the immediate context, then the entire test suite can be run before posting the patch on the issue queue.
You can do so by including a list of test classes to run (see examples); in so doing you might reduce your response time to a matter of seconds.
Drupal 8 examples
Run the command from the working directory with your code changes. The default test environment for Drupal 8 is mysql 5.5 and php 5.4. In lieu of setting properties on the command line, add them to a ‘.testbot’ file in the repository root directory (i.e. the same directory that contains the .git directory).
Description Command All defaults (without .testbot file) drush testbotUsing properties from .testbot file drush testbotSingle test class drush testbot --properties='{"classes":["Drupal\taxonomy\Tests\TermTest"]}'Alternate environment and multiple test classes drush testbot --database='mongodb-2.6' --php-version='php-5.5' --properties='{"classes":["Drupal\node\Tests\NodeQueryAlterTest", "Drupal\node\Tests\NodeRevisionsTest"]}'Drupal 7 examples
The default test environment for Drupal 7 is mysql 5.5 and php 5.3. The command syntax matches that shown above with the addition of the ‘branch:7.x’ parameter to the properties. An example of testing two classes is:
drush testbot --properties='{"branch":"7.x","classes":["NodeQueryAlter","NodeRevisionsTestCase"]}'Instructions
Point your browser to https://github.com/reviewdriven/testbot and see the README file for installation instructions.
Caveat
If our test queue is empty when you submit a patch (and do not specify a list of classes to test), the actual response time for a Drupal 8 patch will be under ten minutes based on existing test suite and available hardware at the time of this writing. If the queue is full, we may not run your patch and will let you know.
Final thoughts
If you have questions, would like to offer constructive comments or suggestions, or want to let us know that you found the tool useful, please post in the github issue queue.
The testbot is provided as a complimentary service to the Drupal community. No financial assistance is received from the Drupal Association (to defray even the hardware costs). Unlike the current testbot which runs on the most powerful compute instances offered by Amazon Web Services, these tests are run on hardware with roughly 25% the processing power yet return results in under half the time.
-
The woes of the testbot
For those not familiar with me, a little research should make it clear that I am the person behind the testbot deployed in 2008 that has revolutionized Drupal core development, stability, etc. and that has been running tens of thousands of assertions with each patch submitted against core and many contributed modules for 6 years.
My intimate involvement with the testbot came to a rather abrupt and unintended end several years ago due to a number of factors (which only a select few members of this community are clearly aware). After several potholes, detours, and bumps in the road, it became clear to me the impossibility of maintaining and enhancing the testbot under the policies and constraints imposed upon me.
Five years ago we finished writing an entirely new testing system, designed to overcome the technical obstacles of the current testbot and to introduce new features that would enable an enormous improvement in resource utilization that could then be used for new and more frequent QA.
Five years ago we submitted a proposal to the Drupal Association and key members of the community for taking the testbot to the next level, built atop the new testing system. This proposal was ignored by the Association and never evaluated by the community. The latter is quite puzzling to me given:
- the importance of the testbot
- the pride this open source community has in openly evaluating and debating literally everything (a healthy sentiment especially in the software development world)
- I had already freely dedicated years of my life to the project.
The remainder of this read will:
- list some of the items included in our proposal that were dismissed with prejudice five years ago, but since have been adopted and implemented
- compare the technical merits of the new system (ReviewDriven) with the current testbot and a recent proposal regarding “modernizing” the testbot
- provide an indication of where the community will be in five years if it does nothing or attempts to implement the recent proposal.
This read will not cover the rude and in some cases seemingly unethical behavior that led to the original proposal being overlooked. Nor will this cover the roller coaster of events that led up to the proposal. The intent is to focus on a technical comparison and to draw attention to the obvious disparity between the systems.
About Face
Things mentioned in our proposal that have subsequently been adopted include:
- paying for development primarily benefiting drupal.org instead of clinging to the obvious falacy of “open source it and they will come”
- paying for machine time (for workers) as EC2 is regularly utilized
- utilizing proprietary SaaS solutions (Mollom on groups.drupal.org)
- automatically spinning up more servers to handle load (e.g. during code sprints) which has been included in the “modernize” proposal
Comparison
The following is a rough, high-level comparison of the three systems that makes clear the superior choice. Obviously, this comparison does not cover everything.
Baseline Backwards modernization True step forward System Current qa.drupal.org "Modernize" Proposal ReviewDriven Status It's been running for over 6 years Does not exist Existed 5 years ago at ReviewDriven.com Complexity Custom PHP code and Drupal Does not make use of contrib code Mish mash of languages and environments: ruby, python, bash, java, php, several custom config formats, etc.
Will butcher a variety of systems from their intended purpose and attempt to have them all communicate
Adds a number of extra levels of communication and points of failureMinimal custom PHP code and Drupal
Uses commonly understood contrib code like ViewsMaintainability Learning curve but all PHP Languages and tools not common to Drupal site building or maintenance
Vast array of systems to learn and the unique ways in which they are hackedLess code to maintain and all familiar to Drupal contributors Speed Known; gets slower as test suite grows due to serial execution Still serial execution and probably slower than current as each separate system will add additional communication delay An order of magnitude faster thanks to concurrent execution
Limited by the slowest test case
*See belowExtensibility (Plugins) Moderately easy, does not utilize contrib code so requires knowledge of current system Several components, one on each system used
New plugins will have to be able to pass data or tweak any of the layers involved which means writing a plugin may involve a variety of languages and systems and thus include a much wider breadth of required knowledgeMuch easier as it heavily uses commons systems like Views
Plugin development is almost entirely common to Drupal development:
define storage: Fields
define display: Views
define execution: CTools function on worker
And all PHPSecurity Runs as same user as web process Many more surfaces for attack and that require proper configuration Daemon to monitor and shutdown job process, lends itself to Docker style with added security 3rd party integration Basic RSS feeds and restricted XML-RPC client API Unknown Full Services module integration for public, versioned, read API and write for authorized clients Stability When not disturbed, has run well for years, primary causes of instability include ill-advised changes to the code base
Temporary and environment reset problems easily solved by using Docker containers with current code baseUnknown but multiple systems imply more points of failure Same number of components as current system
Services versioning which allows components to be updated independently
Far less code as majority depends on very common and heavily used Drupal modules which are stable
2-part daemon (master can react to misbehaving jobs)
Docker image could be added with minimal effort as system (which predates Docker) is designed with same goals as DockerResource utilization Entire test suite runs on single box and cannot utilize multiple machines for single patch Multiple servers with unshared memory resources due to variety of language environments
Same serial execution of test cases per patch which does not optimally utilize resourcesAn order of magnitude better due to concurrent execution across multiple machines
Completely dynamic hardware; takes full advantage of available machines.
*See belowHuman interaction Manually spin up boxes; reduce load by turning on additional machines Intended to include automatic EC2 spin up, but does not yet exist; more points of failure due to multiple systems Additional resources are automatically turned on and utilized Test itself Tests could be run on development setup, but not within the production testbot Unknown Yes, due to change in worker design.
A testbot inside a testbot! Recursion!API Does the trick, but custom XML-RPC methods Unknown Highly flexible input configuration is similar to other systems built later like travis-ci
All entity edits are done using Services module which follows best practices3rd party code Able to test security.drupal.org patches on public instance Unknown, but not a stated goal Supports importing VCS credentials which allows testing of private code bases and thus supports the business aspect to provide as a service and to be self sustaining
Results and configuration permissioned per user to allow for drupal.org results to be public on the same instance as private resultsImplemented plugins Simpletest, coder None exist Simpletest, coder, code coverage, patch conflict detection, reroll of patch, backport patch to previous branch Interface Well known; designed to deal with display of several 100K distinct test results; lacks revision history; display uses combination of custom code and Views Unknown as being built from scratch and not begun
Jenkins can not support this interface (in Jenkins terminology multiple 100K jobs) so will have to be written from scratch (as proposal confirms and was reason for avoiding Jenkins in past)
Jenkins was designed for small instances within businesses or projects, not a large central interface like qa.drupal.orgHierarchical results navigation from project, branch, issue, patch
Context around failed assertion (like diff -u)
Minimizes clutter, focuses on results of greatest interest (e.g. failed assertions); entirely built using Views so highly customizable
Simplified to help highlight pertinent information (even icons to quickly extract status)
Capable of displaying partial results as they are concurrently streamed in from the various workersSpeed and Resource Utilization
Arguably one of the most important advantages of the ReviewDriven system is concurrency. Interestingly, after seeing inside Google I can say this approach is far more similar to the system Google has in place than Jenkins or anything else.
Systems like Jenkins and especially travis-ci, which for the purpose of being generic and simpler, do not attempt to understand the workload being performed. For example Travis simply asks for commands to execute inside a VM and presents the output log as the result. Contrast that with the Drupal testbot which knows the tests being run and what they are being run against. Why is this useful? Concurrency.
Instead of running all the test cases for a single patch on one machine, the test cases for a patch may be split out into separate chunks. Each chunk is processed on a different machine and the results are returned to the system. Because the system understands the results it can reassemble the chunked results in a useful way. Instead of an endlessly growing wait time as more tests are added and instead of having nine machines sitting idle while one machine runs the entire test suite all ten can be used on every patch. The wait time effectively becomes the time required to run the slowest test case. Instead of waiting 45 minutes one would only wait perhaps 1 minute. The difference becomes more exaggerated over time as more tests are added.
In addition to the enormous improvement in turnaround time which enables the development workflow to process much faster you can now find new ways to use those machine resources. Like testing contrib projects against core commits, or compatibility tests between contrib modules, or retesting all patches on commit to related project, or checking what other patches a patch will break (to name a few). Can you even imagine? A Drupal sprint where the queue builds up an order of magnitude more slowly and runs through the queue 40x faster?
Now imagine having additional resources automatically started when the need arises. No need to imagine…it works (and did so 5 years ago). Dynamic spinning up of EC2 resources which could obviously be applied to other services that provide an API.
This single advantage and the world of possibility it makes available should be enough to justify the system, but there are plenty more items to consider which were all implemented and will not be present in the proposed initiative solution.
Five Years Later
Five years after the original proposal, Drupal is left with a testbot that has languished and received no feature development. Contrast that with Drupal having continued to lead the way in automated testing with a system that shares many of the successful facets of travis-ci (which was developed later) and is superior in other aspects.
As was evident five years ago the testbot cannot be supported in the way much of Drupal development is funded since the testbot is not a site building component placed in a production site. This fact drove the development of a business model that could support the testbot and has proven to be accurate since the current efforts continue to be plagued by under-resourcing. One could argue the situation is even more dire since Drupal got a “freebie” so to speak with me donating nearly full-time for a couple of years versus the two spare time contributors that exist now.
On top of lack of resources the current initiative, whose stated goal is to “modernize” the testbot, is needlessly recreating the entire system instead of just adding Docker to the existing system. None of the other components being used can be described as “modern” since most pre-date the current system. Overall, this appears to be nothing more than code churn.
Assuming the code churn is completed some time far in the future; a migration plan is created, developed, and performed; and everything goes swimmingly, Drupal will have exactly what it has now. Perhaps some of the plugins already built in the ReviewDriven system will be ported and provide a few small improvements, but nothing overarching or worth the decade it took to get there. In fact the system will needlessly require a much rarer skill set, far more interactions between disparate components, and complexity to be understood just to be maintained.
Contrast that with an existing system that can run the entire test suite against a patch across a multitude of machines, seamlessly stitch the results together, and post back the result in under a minute. Contrast that with having that system in place five years ago. Contrast that with the whole slew of improvements that could have also been completed in the four years hence by a passionate, full-time team. Contrast that with at the very least deploying that system today. Does this not bother anyone else?
Contrast that with Drupal being the envy of the open source world, having deployed a solution superior to travis-ci and years earlier.
Please post feedback on drupal.org issue.
-
Fitting a board inside a window sill
Working on a personal project, I came across the need to cut a board such that I could rotate it into place inside a window sill. One could cut the board an inch or so sorter, try it out, and adjust as necessary, but what fun is that. Instead we can use math to find the answer!
After drawing out the problem, labeling the knowns and unknowns, I started playing around with the problem for a bit trying to see what relationships I could draw. One can represent the problem as a simple right triangle with the bottom of the board as the hypotenuse, the bottom of the window, and a side of the window as the other sides of the triangle.

Given an angle x you could determine the longest board that would fit (ie the hypotenuse). Given a function that represents the length of a board that would fit at a given angle, the minimum of the function could be found to determine the maximum length board that could make it all the way though. Cosine of the angle between the board and the bottom of the sill (x in the diagram) provides that relationship if the board were simply a line and can be written as follows.
cos(x) = window width (a) / board length (c)Next one needs to account for the fact that the board is not just a line, but has width and when rotated the starting point of the board bottom is moved away from the window sill wall.
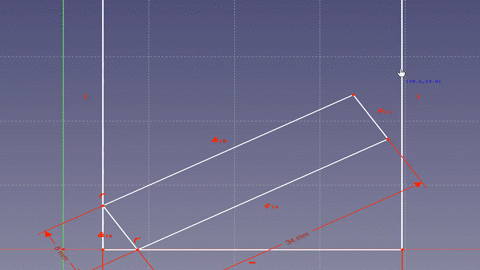
That means the effective length of the window bottom (side a) in our equation is offset by some amount. Looking at the animation you can see that the corner of the board forms two right triangles. Since the bottom of the window is considered a continuous line there are 180 degrees (pi radians) on either side. The board takes up 90 degrees (pi/2 radians) leaving 90 degrees to split between the two angles made by the board with the bottom of the window. If we take the original equation and rewrite it to include the offset from the second triangle we get the following.
cos(x) = (window width - offset) / board lengthWe can create an equation for the small triangle given that we know the hypotenuse is the width of the board we know the angle (z) is complementary to angle x and we are trying to solve for the adjacent side (offset).
cos(y) = offset / board widthSolving for the offset and putting in terms of x:
y = (pi / 2) - x
cos((pi / 2) - x) = offset / board width
offset = board width * cos((pi / 2) - x)
Plugging into the original equation with the offset and solving for board length.
cos(x) = (window width - (board width * cos((pi / 2) - x))) / board length
board length = (window width - (board width * cos((pi / 2) - x))) / cos(x)
Graphed using the following (values for my window and board (1x8)).
window width = 35 inches
board width = 8 inches
minimize (35 - 8 * cos((pi / 2) - x))) / cos(x) over [0, pi/2]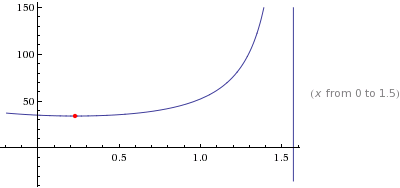
A graph zoomed in to
[0, pi / 4]better demonstrates the length change.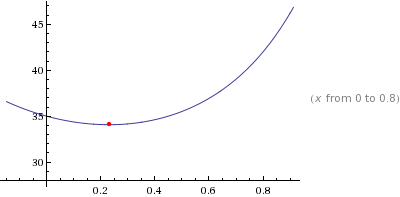
The shortest length the board may be is not while the board is not while resetting flat against the window sill (x = 0 radians) which makes sense. Additionally, in the first graph you can see the board length goes out to infinity at pi/2 (90 degrees) which makes sense if you consider a board standing perfectly upright would never touch the other side of the window. The answer that Wolfram Alpha provides is:
board length = 34.0735 inchesThat means one should cut the board to 34 inches to be able to rotate it into place! For your convenience I have provided a widget which you can use to solve for your own use. Keep in mind this works for more than just windows, any rectangle object you wish to rotate into another rectangle.
For your convenience I created a widget to calculate board width given a window width.